Monday, November 5, 2012

Tutorials: Gratitude Garland

Greetings!  You have arrived at the blog of Andrea Ockey Parr and may I offer you a hearty welcome!  I'm a long-time crafter and an avid literary nerd, but I've only recently tried my hand at blogging.  So thanks for checking out my little corner of the online universe!  I'm also thrilled to be a member of the Scrapbook USA Expo Design Team and am thoroughly impressed with the skills of my teammates.

If you've stumbled onto this Blog Hop by accident, then it's your lucky day!  Here are the details: Between now (Monday, November 5th) and Wednesday (November 7th) at midnight, visit each of our blogs (listed below) and leave a comment. Each time you comment on one of our blogs you will be entered to win 2 of DCWV’s brand spankin’ new Christmas 4X5 pads!!

A chance at a crafty prize?  NICE!  And with Christmas just around the corner these would certainly come in handy!!  So using our math skills (warning!  Mine are minimal), that means that if you comment on each of our blogs, as well as the Scrapbook USA Expo blog, you will be entered eight times!!  Now I'm no statistics expert, but that sounds mighty better than zero entries!  Woo hoo!

Without further ado, here is my Blog Hop Project!

We are now fully entrenched in my favorite time of the year!  The highlights?  Being able to drink hot chocolate without looking like a weirdo (I down the stuff ALL YEAR, which draws some looks in mid-July), wearing power boots and snuggly sweaters, seeing the changing leaves, getting giddy about Santy Claus's impending visit, spending time with family and friends, eating yummy food (thanks, mom!) and reflecting on our many blessings.  What's not to love about Fall?

To get myself into thankful mode, I put together this Gratitude Garland:


Since the holiday season can get a tad busier than I'd like (we all know THAT feeling), I wanted to make something that was fast and easy, but still meaningful.  I decided to make paper leaves listing some of my greatest joys and blessings and I attached them to a store-bought garland.  And if you want to go even lower stress, just stamp words on store-bought leaves!  It doesn't get any more time-saving than that!


The paper I used to make these leaves is from the "Autumn Melody" collection by DCWV.  I cut out some leaf shapes using the Cricut "Accent Essentials" cartridge, then stamped something I was grateful for on each leaf using alphabet stamps.  I inked and distressed the edges of the leaves and crinkled them and folded them to give them some added dimension.  Then I glued them to the garland and put the pumpkin in the middle.


This project is low-stress and is a great visual reminder to slow down and cherish what's truly important.  It would also be fun to do as a family activity with each family member writing down some things they're grateful for on the leaves.


So whether you use this garland as a circular centerpiece, or weave it in between some Fall-colored candles, you can bet that it will not only look good, but it will also be a good reminder of all the things there are to be grateful for!

I hope that you enjoy my blog and that you love hoppin' on to these others, too:

Saturday, November 3, 2012

My Other Creations: Memory Box

Greetings fellow revelers of Fall!  Are we already getting giddy about the holidays??  I know I am!  And this year I wanted to create something handmade that was pretty to look at, but also had the POW of emotional impact.  The result?  This memory box!


So what's the theory of a "memory box" and how did I create it?  I wanted to make something for my mom, who has filled my life with gifts from her talented sewing hands.  She made me beautiful clothes while I was growing up, she sewed a quilt for me when I got married, and she kept my dolls stylin' when I was a kid by surprising me with new outfits for them.  She is so talented in any sort of handwork and I wanted to honor her for that.  So I put together some notions and fabric to fill the inside of the box:


On these items, I wrote some of my favorite sewing-related memories of her (stamped onto the cloth that unrolls from the spools, written on the back of the button packages, etc.).

Next, I included this nifty recordable card from  Picture that Sound.  It's a company that makes cards which you can embellish and record a message onto.  You get 20 seconds of recording time to leave just the right sentiment for your loved one.

The card started out like this:


(Front and back views-- you can decorate either side)


And I made it into this.  My mom will just push the "play" button on the back to hear my message.


Adding a personalized message instantly makes any gift more memorable!  So with the notes written to my mom on the sewing notions and a card with a recorded message, I'm hoping she'll see just how much I love and cherish the beautiful things she's made me over the years.


For this project, I used paper, stickers and embellishments from "The Sweetest Thing" collection from My Mind's Eye.  Always LOVE pretty much anything that MME cranks out!  I also used stick pins from Maya Road and flowers from Prima, some of my other favorite brands.


So if you're struggling to know what to give someone this year, try a memory box filled with things they love, and reasons why you love them, too! 

Tuesday, October 30, 2012

My Cards and Tags: Fly

You know I'm a fabric fiend, so I thought I'd post a picture of this bird card I recently made.  I stamped the bird image, then sewed around it with my machine, shaded it with ink, then added a crown that I cut from a piece of patterned fabric.  I also used a text stamp to help add dimension to the background.


This card is especially meaningful to me because one of the background fabric pieces I used came from a box that was lovingly assembled by my grandma.  She was a quilter and had several boxes of patterned and solid fabric arranged by color and often cut into quilt block triangles and squares; just waiting for her talented hands.  That means a lot to me.  Creativity, after all, is not an isolated gift-- it's something that can tie us to our past and can keep us connected to those we love the very most.  Whenever I incorporate my grandma or mother's fabric or lace, I feel closer to them and have a deep gratitude for the bond we share as we try, throughout our lives, to make things more beautiful.

Monday, October 22, 2012

Tutorials: Easy Halloween Treat

With Halloween upon us, here's a quick and easy treat that involves only THREE (count 'em, THREE) ingredients (cause that's just how I roll when it comes to culinary matters):


Ready for this highly complex recipe?  Here goes!  Take a package of Vanilla-flavored CandiQuik and melt it in its own handy microwaveable tray (side note: they're not kidding when they say to only increase the microwave time by 15 second increments until melting consistency is achieved.  I learned this the hard way one year).


Open some Oreo cookies and dip them into the melted CandiQuik.


Put the cookies down on wax paper then throw on some Halloween sprinkles before the CandiQuik dries.  That's it!  You're done!


For those of you who still may struggle like I do in the kitchen, here's an exciting action shot right after the cookies have been sprinkled.  What you're making should sort of resemble this in some way.


I've yet to meet anyone who doesn't like this treat and it's so quick and easy to do.  I went with a purple and green theme, but you could also incorporate orange and use the Halloween edition Oreo's with orange-colored creme centers.

I bought two packages of plain Oreo's (not Double Stuff) and one package of CandiQuik.  I had a little bit of CandiQuik left over after dipping all the cookies (approximately 90 cookies total).  I bought the CandiQuick and Oreo's at Target and got the sprinkles at Target, Michael's and JoAnn's.

Since the point of this post is "easy" Halloween treats, you can simply put these in cellophane bags when they're done and tie them with Halloween-colored yarn or ribbon.


If you have the time, these also look very cute in paper boxes with tissue paper, coffin boxes, upside down witch hat cones, or ceramic cauldron bowls that you can pick up at the dollar stores on occasion.  No matter how you package them, they'll get eaten up pretty quick and you'll be the hero for bringing something with sprinkles to the party!

Monday, October 15, 2012

My Other Creations: Sewing Tin

Sewing and I have had a love/hate relationship.  I'll spare you the gory details, but let's just say that in junior high, sewing class ruined my nerd-driven perfect GPA.  Why?  I bombed my final project which was one of those silk-backed floral vests that were all the rage in the late 80's.  Remember those things??  Wow!  I still can't look back at those vests without bitterness.  Despite my wonderful mother's sewing skills and teaching attempts, I just couldn't make sense of patterns.  They seemed like a cruel mix of math and hieroglyphics.  Failure, failure.  To this day, patterns and I don't mix.

But I still have a fascination/obsession with fabric.  LOVE IT and only realized in the past several years that you can totally incorporate fabric and sewing into your projects even if you're not a traditional, pattern-using seamstress.  I've at last found peace and balance and have learned that when it comes to sewing, I'm fine as long as I don't know what I'm doing or what I'm supposed to be doing (if that makes sense).

So here's a little tin I made to honor the art of sewing: whether you staunchly follow those mysterious symbols on the tissue paper or not.  It's just a reminder to me that the beauty of most creative endeavors is all about interpretation and execution.  It's about individualism!  If you don't follow a pattern, sew on!  If you do follow a pattern, I admire you!  There's room enough for all of us, no matter our methods, to create amazing things!


Monday, October 1, 2012

My Cards and Tags: Christmas Cards

October 1st and guess what treasure came in the mail today?  The Oct/Nov/Dec issue of The Stampers' Sampler!  And whoa Nelly!  Guess whose Christmas card made the cover??  Great joy and rejoicings!  It's mine!  Pretty sweet surprise.  Here's a visual:


And hey- here's another one of my cards that's inside this issue in the Christmas section:


Sunday, September 30, 2012

My Other Creations: Halloween Bracelets

Today I wore my favorite Fall boots and my hand is cramped from gripping the needle-nose pliers.  You know what that combo means!  You got it!  It's that wonderful time of year when I make my Halloween jewelry!  LOVE IT!

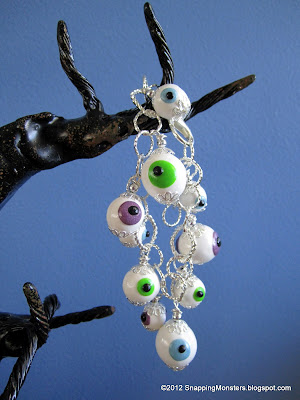
So here are some of the Halloween bracelets I've made this year.  I make all the beads myself from Polymer clay.  I prefer Sculpey brand and then I coat the beads to give them that "glassy" look.  If you like the look of these eyeballs, try making some!  They're totally doable. 

Behold the Monster Bracelet (featuring monster eyeballs and a bat):


And here's the always-classy Eyeball Bracelet:


Are they not cute?  These eyeballs are so versatile and you can use them in endless projects.  They are truly "eye-catching" (ha, ha.  Pun intended, although due to its cheesiness, it probably shouldn't have been).

Tuesday, September 18, 2012

Tutorials: Halloween Test Tube Treats

Since I'm in Halloween mode, I thought I'd include one of the easiest and cutest Halloween goodies that I love to put together every year.  They're test tube treats!  There are all sorts of versions of these out there, but the ones that I make are all about ease.  They're quick to throw together and the recipients always seem to enjoy them.  So here you go!

Step One: Buy this kit of Martha Stewart test tubes (the kit will run you about eight bucks for the set of eight test tubes):


You don't have to go with Martha Stewart test tubes, but I like them for two reasons: they come with cork lids and specimen labels and they're big enough to hold a good amount of candy.

Step Two: Use alphabet stamps or hand-write the tube contents on the labels. (Note: if you don't like Martha's labels, you can also create your own.  You can go as fancy or as plain as you'd like).

Step Three: Fill the tubes with candy and wrap a piece of scotch tape around the top where the cork connects to the tube (the corks pop out easily, so tape is a good idea for reinforcement).

Step Four: Get some yarn or ribbon and tie it around the top of the tube (this hides the aforementioned scotch tape). 

Wah-lah!  You're done!


The tube on the left is awaiting its "Lizard Larva" label.  The tube in the middle shows the Martha Stewart labels that the kit comes with (you can stamp/write whatever you want on them) and the tube on the right has a simple label I made myself.

The hardest part of this craft is trying to decide what to put in the test tubes.  So here's a list of candies and their creepy counterpart names that I've used in the past:

Gummy worms: Medusa Hair
Good and Plenty's (white): Troll Teeth 
Mike and Ike's: Dragon Toes
Jelly beans: Lizard Larva
Certs (left in the cylinder packaging) or other mints: Vampire Repellent
Coconut M&M's (white): Spider Eggs
Cinnamon Red Hot's: Slug Hearts
Candy pebbles: Swamp Rocks
Licorice (black): Rat Tails

If you want to make your test tube treats even fancier, the sky's the limit.  They work great as gifts for teachers, bosses, friends or neighbors or you can tie a name onto the yarn portion and use them as place markers/party favors for a dinner party.  Stand them up in a clear vase or put them in a ceramic cauldron and they make an eye-catching centerpiece.  However you decide to use them, these quick cute vials of sugary goodness are always a crowd pleaser!

Wednesday, September 12, 2012

My Other Creations: Snazzy Salt Shaker

I'm a fan of classic-cool objects (retro, simple, nostalgic and able to be purchased at a thrift store).  What better fits this category than the iconic salt shaker?  Love the knobby bulb-like shaker top and the simple lines of the square glass jar.  I thought this salt shaker (already nifty on its own) deserved a little oomph, a little something more.  And so I bring you my snazzed-up salt shaker:


I embellished this shaker using fabric that I inked, a bit of ribbon, some lace and a flower.  I adore the color combo of green, teal and pink with a little pop of red at the top.


As you can see from this angle, I created the fabric collage first, then simply wrapped it around the jar.  Easy, cheap, fast and a great way to take the look of your storage jars up a notch.  Grab some scraps and give it a try if you have bottles that need labeling (with the contents or an inspiring message)!  And just remember that salt shaker from the thrift store will thank you.

Friday, August 31, 2012

Product Reviews: Traceable Templates Vs. Metal Dies

In today's post, I wanted to go old school and whip out my traceable templates.  I wanted to compare them to metal dies and see if the time spent manually tracing and cutting is worth it.

So I'll start with the finished product and then show you the differences I found between these two ways of making a classic pizza box shape.


So here are the two different methods I used to create two different pizza boxes: a traceable template from Oriental Trading Company for the first box and a metal die from Lifestyle Crafts for the second box.


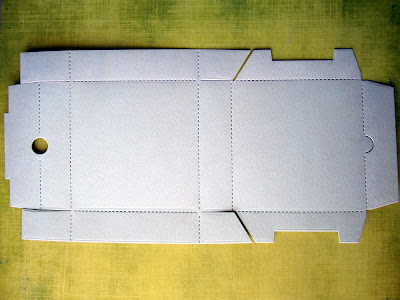
Here are what the shapes looked like after I traced them and cut them out or ran them through a die cut machine.  The top picture is the traceable template and the bottom picture is the die cut shape.


Now here is where a major difference comes into play--the folding!  With the template I traced and cut, I had to use a folding tool to make the folds correct.  With the metal die, the fold lines are perforated, so the paper folds easily where it should.

Here's how the finished boxes look.  The traced template box is the smaller one on the left and the die cut box is the bigger one on the right.


Here's a comparison view of them when open.  The traced template box is the one in front.


So what are the conclusions?  Here are the pro's and con's summarized in addition to the differences you can see from looking at the pictures.

Pro's of Traceable Templates when Compared to Metal Dies
Price, price, price!!  I bought a 10-pack of plastic templates for under ten bucks.  That adds up to less than a dollar per template.  That is significantly cheaper than buying a metal die.  Metal dies can cost $39.99+  for one single shape.  And if you use a metal die, you need a die cut machine, and the machines often stretch into the triple digits.

Nice tight fit with clean folds.  As you can see from the pictures, the traced template pizza box seems to have cleaner lines and tighter folds.  Overall, the completed box felt sturdier and looked better in some ways.  While the dotted lines on the die cut shape allow for easy folding, some people do not love how they look on the finished product.  You don't have these perforated folds when you use the template.

Con's of Traceable Templates when Compared to Metal Dies
Durability.  I guess you get what you pay for.  While traceable templates are a major bargain, after enough time has passed, the plastic will get brittle.  Obviously they won't hold up as well as a metal die.

Time.  Tracing and cutting out a shape takes significantly longer than running the shape through a die cut machine.  In addition to just tracing and cutting the straight lines, you also have to cut the intricate shapes with scissors (like that crescent-shaped closure on the lid) and that's just plain tricky.  Also, it takes longer to fold because the lines aren't perforated (which aesthetically looks better in some people's opinions, but does require more effort on your part).

So there you have it: pro's and con's to both.  I tend to focus on shapes rather than methodology.  If I see a shape I like, I buy it whether it's a traceable template, a manual die, or an electronic die cut shape.  Go with what you're drawn to and if it doesn't fit in your budget, just know that there are always alternatives.  So don't rule out those traceable templates!  There are some cool traceable template boxes that I have yet to see in a metal die format.  I think it's great that the world of die cutting has become vast enough to give us similar products in varying price points.