Showing posts with label Product Reviews. Show all posts

Friday, August 22, 2014

Product Reviews: Memento Ink

I've been in the habit of using Tim Holtz Distress Ink for a long time and I do confess to loving it.  But that doesn't mean there aren't great alternatives out there, too.  I recently had a chance to experiment with Memento Ink (another dye-based ink) and wanted to see if it behaved in a similar manner to Distress Ink.  So I tried out two of my favorite Distress Ink techniques with Memento Ink to create this little "life lesson" tag:


Both Distress Ink and Memento Ink pads are smooth and firm, not spongy.  The first technique I tried with Memento Ink was to stamp the pad onto my craft mat, spritz the ink with water, then mop it up with a couple of tags to create a speckled effect.  I do this technique with Distress Ink all the time.  So how did Memento Ink do?  I used the shade called Teal Zeal and as you can see, it beaded up nicely when I spritzed it with water and was bursting with deep juicy color. 


I dragged two tags through it and really liked the splotchy look I achieved, which was pretty much the same as the look I get with Distress Ink.


My second favorite Distress Ink technique is smudging ink onto my projects with sponges.  I got out my sponges and Memento Ink in shades of Pear Tart, Pistachio, Lulu Lavender, Elderberry and Paris Dusk.  Here's how my tag looked after some smudging fun:


In terms of Memento Ink's smudgability, I was very pleased!  It blended nicely and gave me the type of shadowy weathered look I wanted.  I proceeded to use Memento Ink to stamp on some pattern using the Honeycomb Texture stamp from 100 Proof Press.  Once I had my background done, I finished the tag with this great villain stamp image, called Evil Man, also from 100 Proof Press.  I heat embossed it in black and then added the white scribbly circle around my villain's head using acrylic paint.


I added a touch of pink Memento Ink (Rose Bud) to lighten it up just a bit and then hit the edges with black Gesso.  Once it dried, I sewed some Prima flowers to the side.  At the top, I used alphabet stamps to make my sentiment and topped it with a Hero Arts flower and some yarn.


Another thing that I really liked about Memento Ink is its packaging.  The ink pads are labelled so conveniently and the lids fit very well.  You can almost feel a slight bit of "suction" when you put the lids back on so you know that your ink is going to be protected from drying out.


So how would I rate my Memento Ink experience?  High marks for ease of use, brilliant bold colors and stamping versatility.  I absolutely look forward to using Memento Ink again and think it's a fantastic product.  It's a great alternative to Distress Ink and it was good for me to get out of my rut and see what other amazing products are out there.

Saturday, October 5, 2013

Product Reviews: Imaginisce i-top Button Maker

Today I'm reviewing a tool that's not new, but it was new to me.  It's the i-top button and brad maker by Imaginisce.  I'd debated a long time before buying it and I finally did.  Here's the tool, along with the medium-sized punch you can buy that goes along with the tool.  The punch allows you to punch out the proper size of paper that's going to wrap around your metal "topper." The toppers are all the same style, but you can buy different bases so you can turn your creation into a brad or a snap or a pin, etc., depending on what base you press onto the back.


I started by using the punch to cut out a piece of medium-weight patterned paper.  The punch worked great!


So far so good!  Uh....and then I had to load all the components into the squeeze tool.  Now maybe I'm just not the sharpest tool in the shed, but even though I was an English major, I had to read the directions five or six times and still didn't get what I was supposed to do next.  I ended up looking at the pictures that were included with the tool and on the back of the brad package to finally figure it out.  Thank goodness for pictures and video tutorials!

I loaded my elements in the right order and gave it a squeeze.


The tool presses the metal topper into the paper and all those paper tabs start to wrap around it.  Sort of.  You still have to manually "tuck down" all the tabs before you go further.  So here's how it looked once I started to fold down all the paper tabs around the topper:


After you have your paper tabs pressed down, you put your base in the tool and squeeze it again.  The base is pressed into the topper, which also seals your paper in place.  Wah-la!  Here's my brad coming out of the tool:


Here's how my finished product looks.  Hmmmmmm....


Nice, but a little bumpy around the edges.  Maybe I was not patient or meticulous enough when folding down my paper tabs, but I tried it several times and still got some unsightly wrinkles around the edge of my brad.  I suspect a lighter-weight paper might work better, although the paper I used wasn't even cardstock-weight.


Be that as it may, the tool really is pretty cool in terms of design, so I decided to see if I had any better luck using fabric instead of paper.  I took a scrap of fabric and compared it to the size of the tabbed circle I'd punched out for the paper brads.  Eyeballing my fabric, I just cut my scrap into a similar-sized circle.  I didn't worry about tabs because fabric is more pliable than paper and I figured I didn't need them.


I loaded my rough-cut fabric circle into the machine and squeezed it just like I would for paper.  It was nice to not have to worry about folding down paper flaps.  I just sort of made sure that all parts of the fabric circle were tucked in and then I added the brad base and gave it another squeeze.

Here's how my fabric-covered brad turned out:


Isn't that nice??  So smooth!  In my opinion, it looks way better than the paper brad I made.  And it was easier, too, since I didn't have to punch out a paper shape and fold in all the tabs.

Bottom line advice: if this tool only made paper brads or buttons, I would say to hold off unless you are really an expert at paper-tab folding or doing whatever I DIDN'T do.  But if you like fabric brads, buttons or pins, I think this tool works great.  If you're only going to use the tool with fabric, don't waste your money on the punch (which wouldn't work on fabric anyway and isn't needed).  You can buy i-top traceable plastic templates and that would give you an estimate for how big you'd need to cut your fabric circle.  Or just experiment until you get the right size of circle and save that as your own template.  No tabs, no folding, just a bit of tucking to make sure your fabric will be contained when you smash the back to the front.

Other notes: The tool makes both medium and small sizes of brads.  If you want to make large brads, you have to buy a separate attachment.  I couldn't find instructions on how to change the medium to the small heads on the tool, but you just pull them up, then rotate them 90 degrees, then set them back down.  It's similar to how the Crop-A-Dile lets you flip the different head attachments around.  

Lastly, this may be a no-brainer, but when using paper, remember that this tool won't make shiny epoxy-looking brads that you may be used to seeing.  It really does just look like whatever paper you chose.  It won't magically turn into a fancier brad.  You'd have to paint the paper brad with Glossy Accents or some other substance if you wanted it to have that epoxy look.

The i-top retails for $39.99 at Michaels and the packages of toppers with bases will run about $3.99 for 8 medium brads or 10 small brads.

I know there are tons of you out there who probably have better advice on how to use it and know tricks that I don't know, but I give this tool about a C for paper brads and an A+ for fabric brads. 

Wednesday, September 11, 2013

Product Reviews: We R Memory Keepers Envelope Punch Board

Being an avid card maker who never has the right sized envelopes to fit my cards, I was intrigued when I saw this Envelope Punch Board from We R Memory Keepers.  I admit that while I do have the Martha Stewart scoring board, which comes with an envelope-making attachment, the attachment always looked intimidating and math-ish, so I never gave it a whirl.  I hoped that this envelope-making board would be easy to use and I am happy to report that it is!

Here's the board with the 6x6 piece of paper I decided to make my envelope with:


The nice thing about this board is that it has a bunch of sizes listed on it so you can see exactly what size of paper you'll need to make which size of envelope.  The instructions are also written right on the machine, which was very convenient.

Here's the paper after I'd punched the sides and scored it according to the directions.  It was super fast and easy to do.


The last step was to fold my envelope and glue down the sides.  NOTE: while you can fold scored lines either way (toward you or away from you), if you're using a double-sided piece of patterned paper and you want a certain pattern to be on the outside of your envelope, be sure to put that side facing down.  Whichever side is facing up will be the inside of the envelope if you're following the indentations of the scored lines.  I didn't realize that and had to fold my lines opposite of how I scored them.  Not a big deal, but something I should've noticed sooner in the process.

Here's my envelope after I glued it together. There weren't any rules on how to glue it (which flap goes down first, etc.), so just do it whichever way you think looks best.  I also folded down the little rounded tab that was poking up in the middle to give the envelope a more angular look.


Last but not least, I inked around the outside of my envelope just to give the edges a little more definition.


After using the envelope punch board, I must give it two thumbs up.  I hate math and really appreciated how all the dimensions were written right on the board.  The scoring tool also stores inside the board, which is another handy feature.  It also has two punches in one: the first makes rounded indentations and the other side of the punch makes rounded corners.  Pretty genius to have one punch doing double-duty depending on which side you stick your paper in.  Another nice fact is that the punch doesn't require superhuman strength to press down and the whole thing seems sturdy enough.  I can see this being a very useful tool and for under $20, you can't beat the price.

Thinking of buying the envelope punch board for yourself?  Here's a YouTube video of this cool tool in action to help you make the final decision.  It really is as easy as it looks!


Sunday, September 1, 2013

Product Reviews: Prima "Every Day Vintage" Paintables

For today's product review, I bring you Prima's Paintables from the "Every Day Vintage" collection.  This was a product that was new to me, so I decided to pick up a pack and give the cards a try.

These come in a package of 16 pieces (two each of eight designs) and they retail between $4.99 -$5.50.  They come in three different design packs and the cards come in two sizes (3" x 4" and 4" x 6"), which are the ideal size for Project Life.


These cards are buff-colored and heavy duty with a texture similar to watercolor paper, though not as thick.  But since they are touted as being "paintable," I decided to start with basic, cheapy watercolors.


The paper held up beautifully!  It stayed flat and didn't curl up or shred at all.  Here's the post-painting pic:


After the watercolors worked well, I decided to throw everything I had at this paper.  In the lower left corner, I hit it with two spritzes of Dylusions ink spray (Calypso Teal and Fresh Lime), then followed it up with several layers of stamping (Stampendous Music Score stamp and 7 Gypsies text stamp) and even added some Gesso and acrylic paint.  I used some Recollections alphabet stamps (bought at Michaels) to create the sentiment and stamped a pair of glasses on our distinguished lady using a stamp set from We R Memory Keepers.  I used Ranger Jet Black archival ink and Tim Holtz Black Soot distress ink for the sentiment and to ink around the edges.


All in all, I give this product two thumbs up.  The paper is not invincible (it did get a bit wavy after I hit it with the spritz ink, but I sprayed it at close range and did the spritzes right on top of each other...pretty wet stuff no matter what kind of paper you're using).  But it held up extremely well and I love the images and the vintage look.

Another thing I liked about this product is that it was a good combo of ready-made art and personal art.  I didn't have to do all the work, but the cards were blank enough to let me alter them however I wanted.  The convenient size also makes them easy to turn into a quick gift card or tag.

Lastly, on some subconscious level, I found these cards relaxing to work with.  As I painted inside the lines, it reminded me of all those carefree painting days of childhood.  I didn't have to overthink or stress; I just painted and was happy to follow the lines for once.


Here's a link where you can check out these paintables yourself if they look like something you'd enjoy: Prima Everyday Vintage Paintables.

Sunday, March 31, 2013

Product Reviews: Lifestyle Crafts- Genius Platform

The theory behind the Genius platform system by Lifestyle Crafts is a bit reminiscent of the Lord of the Rings: "One platform to rule them all." 


 Instead of having to build up all those different "sandwich layers" for your various dies and different machines, the Genius platform only has two layers that you'd ever need to use with your paper and dies/embossing folders: the magnetic base platform and either Mat A or Mat B, OR two Mat B's.  Two layers, kids.  That's it!  That is pretty cool.  And it even tells you on the back of the box what combo you'll need for various brands of dies/embossing folders:


Note, though, that you would have to buy an additional Mat B for your big ole' steel rule dies like Sizzix Bigz.  I didn't realize that at first, but even so, it's still only going to be two layers and that is the beauty of the Genius platform system.  Every time I whip out my Big Shot, I can't remember how to layer it up for different things and have to dig up the instruction manual.  That's why I like the Genius platform system.  Even I can remember the formula for base, die, paper, mat.  I also like how it's long enough to accommodate any 12- inch die. 

Another nifty thing about this system is that it comes with a set of 10 nesting dies.  The whole package is $49.99, but the nesting dies alone would cost $29.99.

Here's what the whole set looks like fresh out of the box:


The big blue rectangle is the base platform and it's MAGNETIC.  So for those of you that love that feature in your Revolution machine (yep, I'm still rockin' the Revolution myself), it works the same way with the Genius platform.  The magnetic feature is great for helping to keep your dies and paper lined up.

To see some examples of it layered, here you go!  For everything except chunky steel rule dies (old school Sizzix or Sizzix Bigz, etc.), you put the die or embossing folder on the blue base (make sure you put the cutting side up!), add your paper, then top it off with either Mat A or Mat B.  DONE.  Here's a picture of a Spellbinders die being cut with Mat A:


And here's how it came out:


As you can see, it cut clean and sharp.  The platform is totally solid-- very high quality and I had no problems running it through the Big Shot.

Here's another example of how it handles an embossing folder.  Again, I just used the blue platform base, put my paper in my folder, then topped it with Mat B:


Here's how it turned out:


Very deep grooves and again, no problems at all with sending it through the Big Shot.

As another side note, I did some online research to see if the mats had a "face-down" side or not and it didn't seem to matter.  People used them both ways.  The only thing you have to make sure you do is to put the die in with the cutting side up.  Beyond that, it doesn't matter which side of Mat A or Mat B you put face-down.

Check out the Lifestyle Crafts website to see if the Genius platform is right for you (wow-- I just sounded like one of those medication commercials!!  Sorry about that!)  It really is a great product (in my opinion) and has allowed my brain to use up its precious memory space on things more important than how to layer my Big Shot machine.  

And hey-  if you do decide to buy, make sure you use my savings code (SNAPPING) so you can score yourself a sweet 20% off.

Sunday, March 24, 2013

Product Reviews: Spectrum Noir Markers Review

For quite some time, I've been searching for a good quality alcohol marker that wouldn't break the bank.  Enter Spectrum Noir!


But let's back up and start with the basics: how are alcohol markers unique and what can they offer us crafty folks?  Alcohol makers have alcohol-based dyes which allow you to blend the colors together without your paper getting destroyed (like they might with other types of markers when you try and layer colors).  They're a little more "juicy," than other markers, if that makes sense, which allows you to have the colors (ideally) blend together seamlessly like water colors.  They can be a great tool to use to color in stamped images.

The most well-known brand of alcohol markers are Copic markers, which pretty much set the standard in the field.  Copic markers will cost you about $7 a marker and I didn't want to fork over that kind of money right out of the gates.  That's when I went to JoAnns and saw these Spectrum Noir markers and decided to give them a whirl.  Spectrum Noir markers are only about $1.99 per marker and they come in sets of six.  If you use a 40% off coupon, it's a great deal and it's nice that they come packaged in "color families" to save you the effort of trying to figure out which shades blend together.

Each Spectrum Noir marker has two ends, labeled "broad" and "fine," which you can see below:


You also may notice the square body shape, which is handy if you have a bunch of them on your desk (no stray roll-away markers)!  The lid of each marker (on both ends) is colored and labeled, so that's also a plus.  It's also nice that the marker is labeled as to which end is which.

I bought a few different sets and here is my first Spectrum Noir experiment: a digital stamp from Octopode Factory (artist: Lily Chilvers) that I colored in:


After having used these Spectrum Noir markers, here are some pro's and con's, as well as some advice if you're going to try them out:

1.  Be careful of the markers that are "extra juicy."  While I understand that this is necessary to help them blend, the colors bled a bit more than I anticipated (such as how the flesh color went into her eyeball).  It seemed like some markers were way juicier than others and I had to get to know each marker specifically to figure out how it would blend. 

2.  They are kind of hard to open.  I'm a healthy non-arthritic person, but even my hands got a little tired of yanking the lids off and snapping them back on just right.  Granted, I did this about a billion times because I was experimenting with every single color, but still.  My fingers stayed cramped in "lid pull off position" after awhile.  I know that they have to seal tightly so that they don't dry out, but maybe a more ergonomically friendly design could help.

3.  If the store will allow you to, open the package you're going to buy and try out both ends of each marker before you leave the store!  When I initially bought these, there were several that were dried out, so I had to return them.  JoAnns was cool about it and let me exchange them and test the new packs out before I left, but beware that some could be dried out, which was not a pleasant discovery.

4.  Other than those cautions, I would recommend Spectrum Noir markers to those who want to see if they like alcohol markers, but don't want to commit to the pricier Copic markers.  If you want an "introductory marker" that lets you see how they work, but doesn't break the bank, these are ideal.  They blend well, the color families have some beautiful shades, you can buy refills for every color, and they are super budget-friendly.  

5.  Lastly, whether you decided to go Spectrum Noir or some other brand, an absolute lifesaver for me was to make a color guide first and then keep the markers stored in their respective color families.  The guide doesn't have to be fancy, but it saves a ton of time when you want to know what the marker shade will look like.  Here's the quick one I did:


Bottom line?  Go for the Spectrum Noir if you want to test out some alcohol markers but don't want to pay for pricier brands.  They're easy to use and I've been pleased with the results.  Try just one pack and see how they work.  After all, you can always upgrade later if you become addicted to using alcohol markers and if you don't end up liking them, at least you haven't wasted lots of moo-lah.

Saturday, December 15, 2012

Product Reviews: Fiskars AdvantEdge Punch System

For today's reading and viewing pleasure, I wanted to review a crafty device I recently bought: the Fiskars AdvantEdge Punch System.  Behold!!!!


So what is it and what does it do?  It's a glorified edge punch; like an edge punch on steroids with intricate removable cartridge punches that allow you to cut all sorts of fancy patterns into paper.

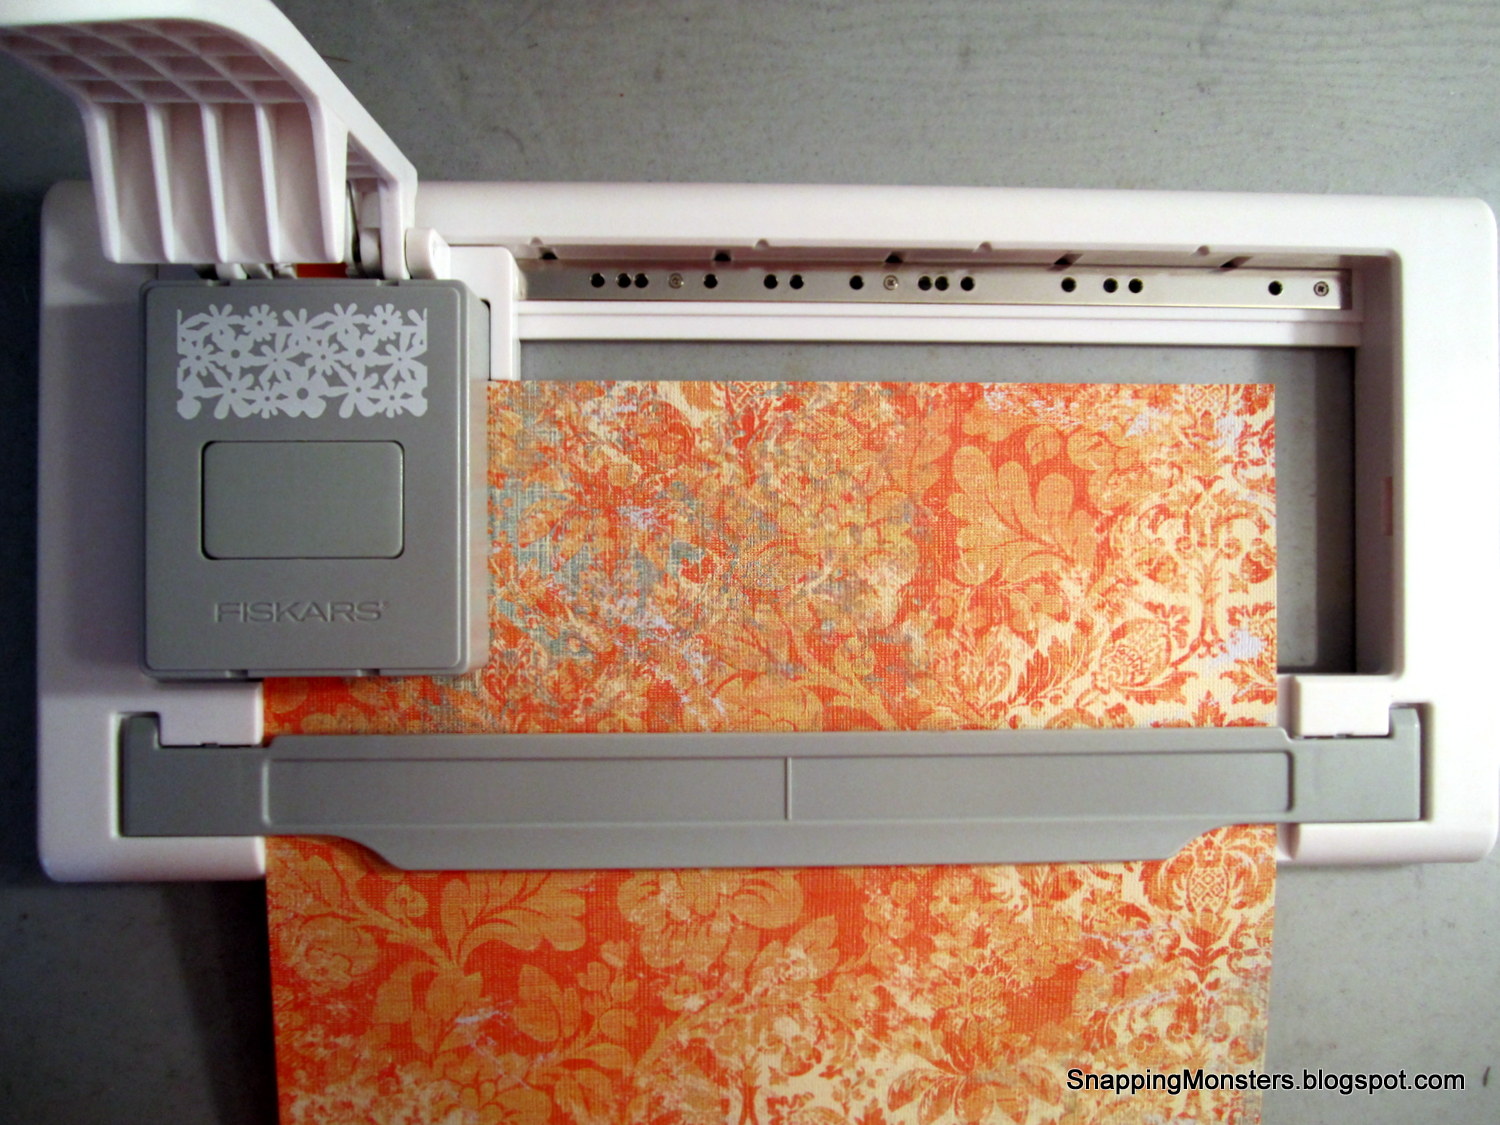
Here's a picture of it when it was fresh out of the box and ready to go for its first run!


It's kind of like a paper cutter, but a punch.  So you load the cassette into the holder (the cassette is the gray box with the flower pattern displayed), then slide a piece of paper in between the metal clamps.  Push down the lever and it cuts out the flower strip for that section.  Now here's where it gets different from other edge punches.  Instead of having to slide your paper to line up for the next section to cut, you slide the cartridge while the paper stays stationary!  And you don't have to guess about where to move it to or line it up because the track has little grooves that the cartridge slides and locks into.  All you have to do is slide it till it clicks and you're automatically lined up for the next punch.

Here's a close up of the cartridge:


If you look at the top of the picture, you can see the little grooves in the white part of the track that the cartridge snaps into as you scoot it along.

And here's a picture of the finished product:


Don't you LOVE that flower pattern?  It's my favorite (called Flower Garden) and it comes with the machine.  

If you want to see the machine in action, check out this Youtube video and then we'll get down to the nitty gritty pro's and con's (in my opinion).


I'm very appreciative of this video and it's actually part of the reason why I bought the machine.  But a clarification or two based on people's comments of this video: it is not hard to use.  Some said that it looked really "stiff" to use or required super-human strength, but I didn't have any trouble with it.  I'm not a bodybuilder and I didn't find it any harder to use than any other craft tool that requires lever-pushing or hand-cranking.  Some people also questioned the sturdiness of either the machine or the table because it looked a bit wobbly.  This machine is quality and is pretty solid, so it's more hardcore than it appears in this video.

Now for the pro's and con's.  One pro that was mentioned in the video is that you can use other smaller Fiskars punch cartridges in it if you use the orange adapter.  I don't have any of these other punches, so that didn't affect my decision to purchase.  What I like about it is the ease of sliding the cartridge and having it lock in place so that your pattern lines up easily.  Two thumbs up for that design.  

Another pro is how wide the borders are.  The flower one I punched out was about 2 1/2 inches thick.  I also like how this machine punches the decoration on both edges of your paper; top and bottom rather than just the top like most edge punches do.

Con's (I won't call them con's because I genuinely like this product, so let's call them "considerations").  The first consideration would probably be price.  The punch machine (which includes the Flower Garden cartridge) will cost you a hefty $49.99 plus tax.  I waited until there was a killer sale at JoAnn's and scored it at 85% off (they had a 60% off sale on all Fiskars products and I combined it with a 25% off your entire purchase- including sale items- coupon).  So I got mine for under $20.  But you really have to think hard if you have to pay full price.  And the cartridges are pricey, too!  One cartridge will run you $29.99.  But again, if you use a sale coupon on them, you can get them for half that price.  And I will say that the cartridges are seriously sturdy!  There's nothing cheap about them at all.

The second point to keep in mind is this machine's size.  We all know how our crafty space is at a premium and this machine is approximately 17" long by 8" wide.  It takes up the same amount as a paper cutter, yet you probably won't use it as often.  If you have a place to stash it, go for it.  But if you'll have to leave it out on your work space all the time, you'll really want to decide if the space it takes is worth it for how often (or not) it will be used.

The third thing to consider is that at present, there's not a huge variety of big cartridges.  As far as I could find, there are only about eight of these big new cartridges besides the one it comes with.  And if this system doesn't catch on and it's dropped from production, then that's all there will ever be.  The crafting/scrapbooking market is brutally competitive and always changing, so products do come and go pretty quickly.  Is it worth it to pay that much for a system that you might potentially only buy two or three cartridges for?  Again, that is something to think about.

Despite all of these considerations, the bottom line is that I'm impressed with this machine, I'm glad I bought it, and I'm looking forward to incorporating these decorative borders into some of my projects.  If you can get it for a discount, I'd recommend it because of its ease of use, its durability and the width of the borders it cuts.

Friday, August 31, 2012

Product Reviews: Traceable Templates Vs. Metal Dies

In today's post, I wanted to go old school and whip out my traceable templates.  I wanted to compare them to metal dies and see if the time spent manually tracing and cutting is worth it.

So I'll start with the finished product and then show you the differences I found between these two ways of making a classic pizza box shape.


So here are the two different methods I used to create two different pizza boxes: a traceable template from Oriental Trading Company for the first box and a metal die from Lifestyle Crafts for the second box.


Here are what the shapes looked like after I traced them and cut them out or ran them through a die cut machine.  The top picture is the traceable template and the bottom picture is the die cut shape.


Now here is where a major difference comes into play--the folding!  With the template I traced and cut, I had to use a folding tool to make the folds correct.  With the metal die, the fold lines are perforated, so the paper folds easily where it should.

Here's how the finished boxes look.  The traced template box is the smaller one on the left and the die cut box is the bigger one on the right.


Here's a comparison view of them when open.  The traced template box is the one in front.


So what are the conclusions?  Here are the pro's and con's summarized in addition to the differences you can see from looking at the pictures.

Pro's of Traceable Templates when Compared to Metal Dies
Price, price, price!!  I bought a 10-pack of plastic templates for under ten bucks.  That adds up to less than a dollar per template.  That is significantly cheaper than buying a metal die.  Metal dies can cost $39.99+  for one single shape.  And if you use a metal die, you need a die cut machine, and the machines often stretch into the triple digits.

Nice tight fit with clean folds.  As you can see from the pictures, the traced template pizza box seems to have cleaner lines and tighter folds.  Overall, the completed box felt sturdier and looked better in some ways.  While the dotted lines on the die cut shape allow for easy folding, some people do not love how they look on the finished product.  You don't have these perforated folds when you use the template.

Con's of Traceable Templates when Compared to Metal Dies
Durability.  I guess you get what you pay for.  While traceable templates are a major bargain, after enough time has passed, the plastic will get brittle.  Obviously they won't hold up as well as a metal die.

Time.  Tracing and cutting out a shape takes significantly longer than running the shape through a die cut machine.  In addition to just tracing and cutting the straight lines, you also have to cut the intricate shapes with scissors (like that crescent-shaped closure on the lid) and that's just plain tricky.  Also, it takes longer to fold because the lines aren't perforated (which aesthetically looks better in some people's opinions, but does require more effort on your part).

So there you have it: pro's and con's to both.  I tend to focus on shapes rather than methodology.  If I see a shape I like, I buy it whether it's a traceable template, a manual die, or an electronic die cut shape.  Go with what you're drawn to and if it doesn't fit in your budget, just know that there are always alternatives.  So don't rule out those traceable templates!  There are some cool traceable template boxes that I have yet to see in a metal die format.  I think it's great that the world of die cutting has become vast enough to give us similar products in varying price points.