Monday, April 24, 2023

Simon Says Stamp Monday Challenge: Make Your Mark Journal Page using a Dylusions Creative Journal and Dina Wakley's Sparks 2 Collection

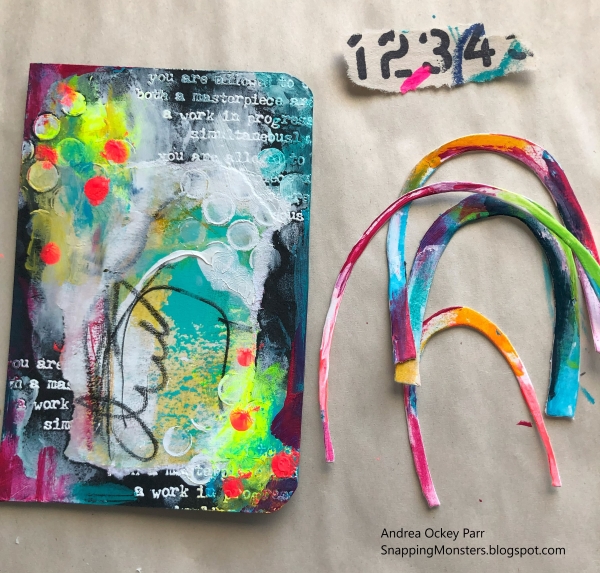
"Make your mark" is this week's theme for our Simon Says Stamp Monday Challenge.  There are all sorts of ways you could interpret this theme, but I think that making your mark means you created marks -- scribbles, sketches, circles or dots -- free-handed style.  The marks are uniquely yours because you drew them yourself.


I started with my Dylusions Creative Journal and glued down some patterned paper from Simple Stories' Flea Market collection.  I also added some AALL & Create's Mix and Match washi tape.  I don't know why I include early photos of my projects, though, because this will all get covered up anyway.  Even so, sticking something on the page helps to get the creative juices flowing, so I guess it's a worthwhile part of the project.  And spoiler alert: the end project looks NOTHING like it did during these next few steps.


I smeared on some white acrylic paint and then added colored acrylic paint.


Some other steps happened next that involved a big mess of purple that I didn't like, so I tried to wipe all of it off.  The whole color palette ended up going a little haywire after that and not at all like I had first envisioned, but it was good to have myself be pushed out of my color comfort zone a bit more than usual.  I also stamped some circles onto my project's background using Darkroom Door's Open Circles stamp.  Then I grabbed Dina Wakley's Sparks 2 patterned paper, tore off a chunk and glued that to my page.


After that, I glued on some other scraps and started making my own marks with paint dots and scribbly circles.  I added even more splotches and scribbles as I went along.


I added more things here and there and tweaked this and that.  I used Dina Wakley's Scribble Sticks to scribble around the edges of the page.  I also used Dina's Ledger 2 paper to cut out the sentiment, which I glued to the middle of my page.  I added some more washi tape on, since most of it had gotten covered up, and this page was done!


Here are the supplies I used that you can find at Simon Says Stamp:

How will you make your mark this week?  Upload your creations to the Simon Says Stamp Monday Challenge Blog for your chance to win a $25 voucher to the Simon Says Stamp store!


Monday, April 17, 2023

Simon Says Stamp Monday Challenge: Notebook Cover using Whimsy Stamps' Boho Rainbow Dies and Dina Wakley's Ledger Paper, Set 2

We are focusing on rainbows this week for our Simon Says Stamp Monday Challenge.  I made a notebook cover using Whimsy Stamps' Boho Rainbow dies.


I started by cutting some rainbow arches using my Sizzix Big Shot and white Strathmore Mixed Media paper.  I fingerpainted them with acrylic paint.


Next I used black Strathmore Mixed Media paper to cut out a piece that was the same size as the notebook I wanted to cover.  I embossed some white text on the front with a Tim Holtz stamp called Theories, embossing ink, white embossing powder and a heat tool.  I also tore off a scrap to use from the leftover collage I'd made for last week's project.  See what I mean about collage scraps?  They are the gift that keeps on giving!


I glued the big scrap to the middle of my cover.  Next I stenciled some white dots onto my black background using Tim Holtz's Gradient Dots stencil and some white paint.  I smeared on more acrylic paint in bright colors and added another collage scrap (stamped numbers) to my pieces.


I glued everything down and added some scribbled circles and lines.  I finished it off with a sentiment I cut from Dina Wakley's ledger paper, set 2.  Then I sewed my cover to my notebook and this little notebook re-do was done!


Here are the supplies I used that you can find at Simon Says Stamp:

How will you incorporate rainbows into your projects this week?  Upload your creations to the Simon Says Stamp Monday Challenge Blog for your chance to win a $25 voucher to the Simon Says Stamp store.


Monday, April 10, 2023

Simon Says Stamp Monday Challenge: Be Still Tag using Dina Wakley's Collage Sparks 2 and 3

It's another Monday and that means another challenge over at the Simon Says Stamp Monday Challenge Blog!  The theme is "get lucky."  I always feel like its a lucky day when Dina Wakley comes out with new products, so I used her new Collage Sparks paper packs to add some oomph to my tag.


I started with a Ranger Kraft tag that I smeared with acrylic paint.  I used Dina's Scribble Sticks, too.


Next I tore out some scraps from Dina's new Collage Sparks paper packs.  I glued some of them on and saved some out to see if they would fit in somewhere later.  I also painted some bright yellow dots onto my tag and cut out a scallop edge using Simple Stories' Flea Market paper.  


I glued everything together and did some more scribbling and added more paint around.  It was such an explosion of color (and a little crazy) that I thought the sentiment of "Be Still" (which I have to remind myself to do often) was both ironic and appropriate.  I typed the sentiment with a typewriter.


Here are the supplies I used that you can find at Simon Says Stamp:

We're excited to see your interpretation of this week's theme!  Upload your creations to the Simon Says Stamp Monday Challenge Blog for your chance to win a $25 voucher to the Simon Says Stamp store!


Monday, April 3, 2023

Simon Says Stamp Monday Challenge: Layered Cards using Elizabeth Crafts' Tickets and Tabs Dies and Tim Holtz's Collage Layer Frames and Collage Strips

This week's Simon Says Stamp Monday Challenge is to add some texture.  We're also highlighting products from Tonic.  I decided to create texture through layers and by using Tonic's Crystal Drops for this card trio I made.


This process was a long one, I'm not gonna lie!  But the good thing about making collage sheets is that you can use them for projects down the road, too.  I love adding layers by making and then gluing scribbly paper together.  For this project, I started by cutting some ticket shapes with Elizabeth Crafts' Tickets and Tabs Dies and then stamped them with Darkroom Door's Open Circles stamp.  Next I used Tonic Watercolor pencils and a paintbrush to color in a few of the dots.


While that was drying, I made a paint collage that I planned to tear up and add as scraps to my background tickets.  I dotted some acrylic paint onto my paper, then smeared it around on the paper with water and a brush.


Once that dried, I added some white paint, scribbles, and marks with a Distress Crayon.  I also used the watercolor pencils again to draw around my arch-shapes.


One ready-to-be-torn piece of paper was done, but I wanted to make another one that had stamping on it.  I took a piece of newsprint and stamped some letters and images onto it using different colors of ink and Tim Holtz's Grunged and School Desk stamp sets.  I also added watercolors, paint, and Distress Crayon scribbles to this background page.


Now my papers were ready to tear and glue and mix and match.  Here's how my three ticket sections were looking after I added scraps and more paint to them:


Now I had three collaged tickets, but I was a bit stuck on what to do next.  I dug through my supplies and decided on some Tim Holtz Collage Layer Frames, which I added paint to.

While I was in my Tim Holtz supply bin, I came across his Collage Strips and cut out a few images from those to use (the bird and the people).  I glued and collaged everything together for the final results.  On this card below, I ripped the ticket on its perforated line and used the curved side as a tab at the top of the card.


With this card pictured below, I ripped the ticket strip in half and stacked them up.  I also added a tab.


And here is how the last one turned out with the scallop-edge I cut, painted and tacked on the top:


For that final last pop of texture, I added some dots of Tonic Crystal Drops in Caribbean Ocean and these cards were done!

Here are the supplies I used that you can find at Simon Says Stamp: