Tuesday, January 15, 2013

My Cards and Tags: SOUS January 16th Card Challenge

Wow!  You know I always love the card sketches that SOUS provides, but this one was especially fun to work with!  Here's the card I made:


And here was the sketch I based it off of, which was created by that ever-clever Nanne Harry!


My card is made from a gorgeous pastel paper collection called "Butterfly Garden" by Pink Paislee.  The light blue arrow with chevron stripes is from My Mind's Eye.  I also incorporated a 4-inch doily from Wilton that I found in the baking section at Michaels.


As usual, the flowers are from Prima (LOVE Prima!) and the pearl stick pin is from Maya Road.  The baker's twine is by American Crafts and the button is also from My Mind's Eye.  I threw on a little scrap of polka-dot fabric to give it some flair.


I made a ticket using the Tim Holtz ticket strip die and I stamped it with a crown image from Heidi Swapp.  I inked around most of the edges with Tim Holtz Distress Ink, Walnut Stain color.


My home town has been hit with more snow than what we know what to do with lately, so I'm pretty sure my brain is frozen from all of the inhaled sub-zero air.  And hey- when your brain's in frozen mode, there's nothing better than finding a great card sketch to inspire you!  I'm telling you- if you need some fabulous sketches for either cards, layouts or die cuts, check out the Stuck On U Sketches blog.  I haven't been on their Design Team for all that long, but I've honestly loved every minute and the inspiration these talented ladies provide has been phenomenal!

Thursday, January 10, 2013

My Cards and Tags: Little Blue Dress

It's Thursday night and it has been snowing ALL day!  I'm talkin' mega white stuff out there.  It's bitter cold and the sky is frozen gray gloom, which is exactly why I felt the need to post a picture of my Little Blue Dress card.  Doesn't it just say Spring and flowers and sunshine and posh garden parties and lemonade??


NOT that I'm one of those "the grass is always greener" people, and snow really is beautiful in its own way, but I'm just saying that it's nice to have a reminder of warmer days when you're inhaling air so cold that it instantly freezes the inside of your nose (not even kidding).

To make this card, I used an Inkadinkado dress stamp which I outlined in black with my sewing machine.  I layered up the fabric, stamped the sentiment, inked here and there, then glued it all to a divine piece of polka-dot background paper from Fancy Pants. 

Well, a quick glance outside reveals that the snow is still falling.  Now that I've had this little moment of Spring, there's nothing left to do but hope I get snowed in.  After all, it's Friday Eve, the glue gun's already plugged in and the hot chocolate is calling my name!  Doesn't get much better than that!

Wednesday, January 9, 2013

Tutorials: Magnetic Cookie Cutter Calendar

Happy first Counterfeit Kit Challenge!  Our task?  Use the counterfeit kits we made, plus COOKIE CUTTERS, and create a masterpiece!  Whoa Nelly!  A baker I am not, so my first task was to locate the baking supply section at Michaels.  :)  Once I found it, I lucked out and found an awesome cookie cutter set that was made for making gingerbread houses.  So long story short, here is my creation: A Magnetic Cookie Cutter Calendar!!


So let's break it down!  You may recall that this is the kit I assembled that I would be using for this project:


Here's the Gingerbread cookie cutter set I bought (picture courtesy of the Wilton website  since I forgot to snap a picture of mine before I destroyed...ahem...re-purposed it):


So I wanted to elongate the shape of the house, so I cut the bottom of the rectangle shape and the bottom of the triangle shape, bent the edges and combined them into one big house shape.  I glued the two shapes together with E6000 and clamps.  It's about 10 inches high and 5 inches wide.

I knew early-on that I wanted this thing to be some sort of magnetic memo board or calendar, so I traced my house frame onto a flat sheet of thin metal.  I then used a metal tool to cut it into a house shape (sorry I can't be more specific: my husband bought this tool from a classified ad and the best way I can describe it is like a paper-cutter with a lever, only when you pull the lever down it cuts metal instead of paper.  I don't know what it's called, but it is a champ)!


Important note!  Test the metal with a magnet to make sure it's actually magnetic!  I did this whole process with a piece of non-magnetic metal and had to re-do it once I watched my magnets slide off!

I laid the metal house shape into the house frame and glued it to the flat bars on the back (see the bars on the back of the cookie cutters?)  Here's a picture of the back of the project (pretty it is not):


Once that was all situated, it was just a matter of covering the whole thing with paper, which I did.  I glued the paper down using an industrial-strength glue stick that works on all surfaces.  This is what it looked like at that point:


I made the scallop roof edges from cutting out the circular token-looking things from one of the pieces of patterned paper and bending them over the roof.  I may have also cheated with the bright pink strip of paper because it was the back side of one of the pieces I had in my kit.


Lastly, I made the separate elements that are removable:


I glued a magnet to a Tim Holtz clip and also added a magnet to the back of the bottlecap with the button, yarn and pin.  I put some more patterned paper on the January calendar for some added oomph.  The magnets hold up the calendar.

I also added some glass bottles (one that's filled with "spunk" and another with happy-looking glitter).  I added a vintage thimble as the final touch.


So how is this a "calendar"?  Well, I'm usually adept at knowing what day it is, but what I really wanted was a monthly reminder of my crafting deadlines.  So the paper with the 6, 11, and 15 are dates in January that I had crafting projects due, along with an abbreviated description of the project.


When February rolls around, and subsequent months, all I'll have to do is switch out the calendar card and make a new piece of paper with February dates noted.  

So there you have it!  A use for cookie cutters that did not force me to spend time in the kitchen!  That, my friends, is a success for me!  And the bonus is that now I'll stay more organized and have a visual reminder of all those exciting crafting projects on the horizon.

Saturday, January 5, 2013

My Cards and Tags: Fabric/Heart Cards

Here are two cards I made for a challenge that required using fabric and hearts:


Isn't that stamp the greatest??  I fell in love with it immediately.  It's designed by Jane Davenport and is available for purchase on the Stamping Bella website (if you've never browsed Stamping Bella's, there are TONS of cute girly stamps-- all on unmounted rubber).


For this one, I incorporated the tiny hearts onto an old button card and stitched them in the center to make them look button-esque.  I decided to go with a sewing theme.

Tuesday, January 1, 2013

My Cards and Tags: January 2nd SOUS Card Challenge

Happy 2013!  Now we'll just see how long it takes me to stop writing 2012 on stuff (my average is about a two month transition)!

Anyhow, what HAS started this year out in spiffy style is the fantastic January 2nd card sketch by the ever-inspiring Nanne Harry.  We were encouraged to utilize scraps for this card, so here's the scrappy finished product I came up with:


Here's Nanne's sketch that I based my card off of:


You'll notice that I made a few changes.  I only used two hexagons and created the rest of the cascade pattern from vintage ephemera and scraps.  I wanted all of the pieces to reflect the arts, travel and inspiration.  The "daily double" race ticket and DA issue stub are vintage while the theatre tickets and "Metro" word are from Tim Holtz.


I used two different Spellbinders nestabilities die sets for this card: the Hexagons set and the Labels Eight set (center where sentiment is stamped).


The sentiment is one of my all-time favorite quotes and comes from the Tim Holtz Stamper's Anonymous "Purely Random" set.  The lightbulb is also from Tim Holtz.  I added a fabric scrap and Prima flowers then attached the whole thing to some paper from My Mind's Eye.

All in all, this sketch was a great one to launch 2013 and I can't wait to see what else those clever ladies at Stuck on U Sketches come up with! 

Monday, December 31, 2012

My Craft Resume

Andrea Ockey Parr

My name is Andrea Ockey Parr and I'm a mixed-media artist whose mediums of choice include paper, paint, stamps, fabric scraps and ink.  I've also designed rubber stamp sets which I produce and sell through my Etsy shop, Snapping Monsters.

Current Design Teams:
     Simon Says Stamp (7/13 - present)

Past Design Teams:
     Stuck On U Sketches: Card Team (12/12 - 7/13)
     Counterfeit Kit Challenge(1/13 - 6/13)
     Crafting Ireland Online magazine (2/13 - 10/13) 
     Scrapbook USA Expo (10/12 - 10/13)
     Lifestyle Crafts Studio / We R Memory Keepers (8/13 - 12/14) 
     100 Proof Press (8/14 - 2/15)

Guest Designer:
     100 Proof Press (9/13)
     Purple Onion Stamps (11/13 - 12/13) 
     A Vintage Journey (4/14)
     Whimsy Stamps (8/17 and 10/17)

Bonus Kudos:
     Featured Guest Artist in The Stampers' Sampler magazine (2/12)
     Featured Artist for Mixed Media May (5/14) 
     Created a project displayed at Tim Holtz's Ideaology booth at the January 2015 CHA

Other Skills:
     Experienced teacher and public speaker
          Secondary Teaching Certificate, junior high teacher for 5 years
     Excellent written and verbal communication skills
          Majored in English and minored in Communication
     Enthusiastic about teaching crafty techniques and encouraging artistry

In Print Publications:
     July/August 2009: Cloth Paper Scissors, "Life's A Beach" challenge winner
     March/April 2010: Cloth Paper Scissors, "Mother Earth Art Doll" challenge winner
     Sept/Oct 2010: Cloth Paper Scissors, Halloween Necklace
     Nov/Dec 2010: Cloth Paper Scissors, Quirky Wire Houses (featured on the cover)
     Holiday 2010: Cloth Paper Scissors Gifts, Christmas ATC
     Dec/Jan 2011: The Stampers' Sampler, Elf on Bird card (featured on the cover)
     Summer 2011: Stuffed, Pandora's Box monster shadowbox
     Nov/Dec 2011: The Stampers' Sampler, Christmas card and gift card tin
     Premiere Issue 2011: Cloth Paper Scissors Pages, lip gloss tin mini book
     Winter 2011: Stuffed, Three Monsters
     Feb/Mar 2012: The Stampers' Sampler, Guest Artist article (featured on the cover)
     Summer 2012: Stuffed, Business Bats
     Sept/Oct 2012: Somerset Studio, Edgar Allan Poe challenge- Raven Crown
     Oct/Nov/Dec 2012: The Stampers' Sampler, Christmas cards (featured on the cover)
     Winter 2012: Sew Somerset, Altered Sewing Tins
     Jan/Feb/Mar 2013: The Stampers' Sampler, Fabric Fixation and Tiny Hearts cards
     May/June 2013: Cloth Paper Scissors, Urban Birds (featured on the cover
     Summer 2013: Sew Somerset, Fabric Flashcards
     Summer 2013: Somerset Studio Gallery, Art Ticket card 
     Jul/Aug/Sept 2013: Stampers' Sampler, Fairy Tale Village
     Autumn 2013: Stuffed, Wizard Lizards 
     Volume 7, 2013: Somerset Holidays and Celebrations, Snowflake Crowns
     Winter 2014: Somerset Studio Gallery, Christmas card
     Jan/Feb/Mar 2014: The Stampers' Sampler, Mail Art 
     April 2014: We R/Lifestyle Crafts Product Catalog, two cards using Farmer's Market line
     Apr/May/June 2014: The Stampers' Sampler, four painted Washi cards and tags
     Summer 2014: Somerset Studio Gallery, Fabric Mache'd Cupcakes 
     July/August 2014: Cloth Paper Scissors, Postage Stamp challenge winner 
     Oct/Nov/Dec 2014: The Stampers' Sampler, Christmas tag 
     Jan/Feb/Mar 2015: The Stampers' Sampler, Tea Bag Tags 
     Summer 2015: GreenCraft, Recycled Shoe Photo Displays
     Summer 2015: Sew Somerset, Travel Tins 
     Oct/Nov/Dec 2015: The Stampers' Sampler, Christmas tag
     Nov/Dec 2015: Cloth Paper Scissors, Anti-math Mini Garland
     Winter 2016: Sew Somerset, Fabric Scrap Cakes
     Apr/May/June 2016: The Stampers' Sampler, Celebration Cards and Tags
     Apr/May/June 2016:  Somerset Life, No-sew Notebooks
     Summer 2016: Somerset Studio Gallery, Fiber Binder 
     Jul/Aug/Sept 2016:  The Stampers' Sampler, Happy Haunting card
     Jul/Aug/Sept 2016:  Art Journaling, Art Journal Folio 
     Nov/Dec 2016: Somerset Studio, Artist Paint Tags and Christmas Tree Tags
     Dec/Jan/Feb 2017: Take Ten, Pint-Sized Cards 
     Apr/May/June 2017: The Stampers' Sampler, Celebrate Flight cards
     Spring 2017: Somerset Apprentice, Embroidery Floss Houses
     Spring 2017: Somerset Home, Mini Memo Boards
     Summer 2017: Sew Somerset, Finned Friends Fabric Fish
     July/Aug/Sep 2017: The Stampers' Sampler, Good Things Inside pitcher card, Travel
          Quote cards, and Toil & Trouble Halloween tag
     July/August 2017: Somerset Studio, Bubble Wand tags and Autumn Swirl Trees tags
     Oct/Nov/Dec 2017: The Stampers' Sampler, Christmas Tag Trio
     Oct/Nov/Dec 2017: Somerset Apprentice, Ask the Pro's
     Autumn 2017: Somerset Life, Quote Blocks
     Nov/Dec 2017: Somerset Studio, Mini Notebooks
     Jan/Feb/Mar 2018: Art Journaling, House Memories
     Jan/Feb/Mar 2018: The Stampers' Sampler, Different Point of View (featured on cover)
     
Contact Info:
Please feel free to email me at friend_of_ben@yahoo.com
         

Thursday, December 27, 2012

My Cards and Tags: Let Them Eat Cake

Greetings loyal readers!  Forgive my neglect of you over the past few days.  My husband and I spent some unexpected quality time in the ER over the holidays.  Yep.  I'll spare you the medical details as things are better now, but suffice it to say that while Saint Nick was making his rounds, I was foraging in the hospital cafeteria for anything under a heat lamp that was still edible.  But I can honestly say that I'm grateful for the lessons I learned during this unique and humbling Christmas experience: that Christ is still an active healing force in our lives (for which I will always be grateful) and that people matter infinitely more than presents.  Love and thanks go to our families and our awesome neighbors who kept the driveway shoveled in our absence during the worst storm of the year!  I also want to give a shout-out to compassionate healthcare workers everywhere who sacrifice their holiday festivities to comfort those who are sick.  Most of all, I want to thank my husband for being who he is: even in pain, even with IV's in his arms and tubes in his nose, and even with self-proclaimed bed-head, that man's a class act that constantly teaches me how to live selflessly.

Okay, okay!  Enough of my Oscar Award-esque "thank you" speech.  Let's move on to the craftiness!  Check out this card I made with my favorite stitch-around-a-shape technique:


Have I mentioned how much I LOVE vintage childrens' dictionaries?  I'm always on the lookout for them at the local thrift storesI cut out the "Cake" text from a great little dictionary and stuck it next to my fabric cake slice.  To make the slice (or any shape), all you have to do is trace it, stamp it or draw it onto fabric and then sew around it with your sewing machine. 


I thought I'd also snap a shot at a bit of an angle just in case you had any doubts about my obsession with layers.


Good stuff and all I did was add some ink around the edges of some of the layers to give them even more depth.  So hey- if you're struggling with a card or art project, consider building up instead of out.  There's a great satisfaction that comes with layering different colors, textures and patterns and bonus points go to you if your card's too thick for an envelope by the time you finish!

Tuesday, December 18, 2012

My Cards and Tags: December 19th SOUS Card Challenge

December 19th and what a gorgeously fun card sketch from SOUS Designer Sandi!!  I thought I might as well go in a Christmas direction with this one since we are a week away from the Big Day!  Here's the card I made:


And here's Sandi's wonderful sketch that I based it on:


Here are the supplies I used for my card:
Paper: Basic Grey, MME, Prima, Fancy Pants and Daisy D's (the sledders)
Stamp: Christmas ticket (Tim Holtz)
Punches/Tools: Snowflake (Marvy Uchida), scalloped half circle (Fiskars Flower Garden from the AdvantEdge system [I wrote about this machine a couple of posts ago]), and the Corrugator Paper Crimper (Marvy Uchida).
Ink: Colorbox, Tim Holtz, Martha Stewart

Here's a close-up of the Tim Holtz Christmas ticket stamp and the retro-looking sledders that I cut out of a piece of patterned paper.


I also cut some green triangles and fed them through my crimper tool to create these textured trees:


With the intricate flower pattern border I cut out with the Fiskars machine, I bunched and folded it accordian-style (like half a rosette) and used it as my semi-circular background:


This card layout was unique and innovative, yet quite do-able.  And remember-- whether it's cards, layouts or die-cut designs that you're looking for, check out the Stuck on U Sketches blog!  I've only done two cards as a member of their Design Team so far, but I've loved this adventure so far and can't wait for the next one!

Saturday, December 15, 2012

Product Reviews: Fiskars AdvantEdge Punch System

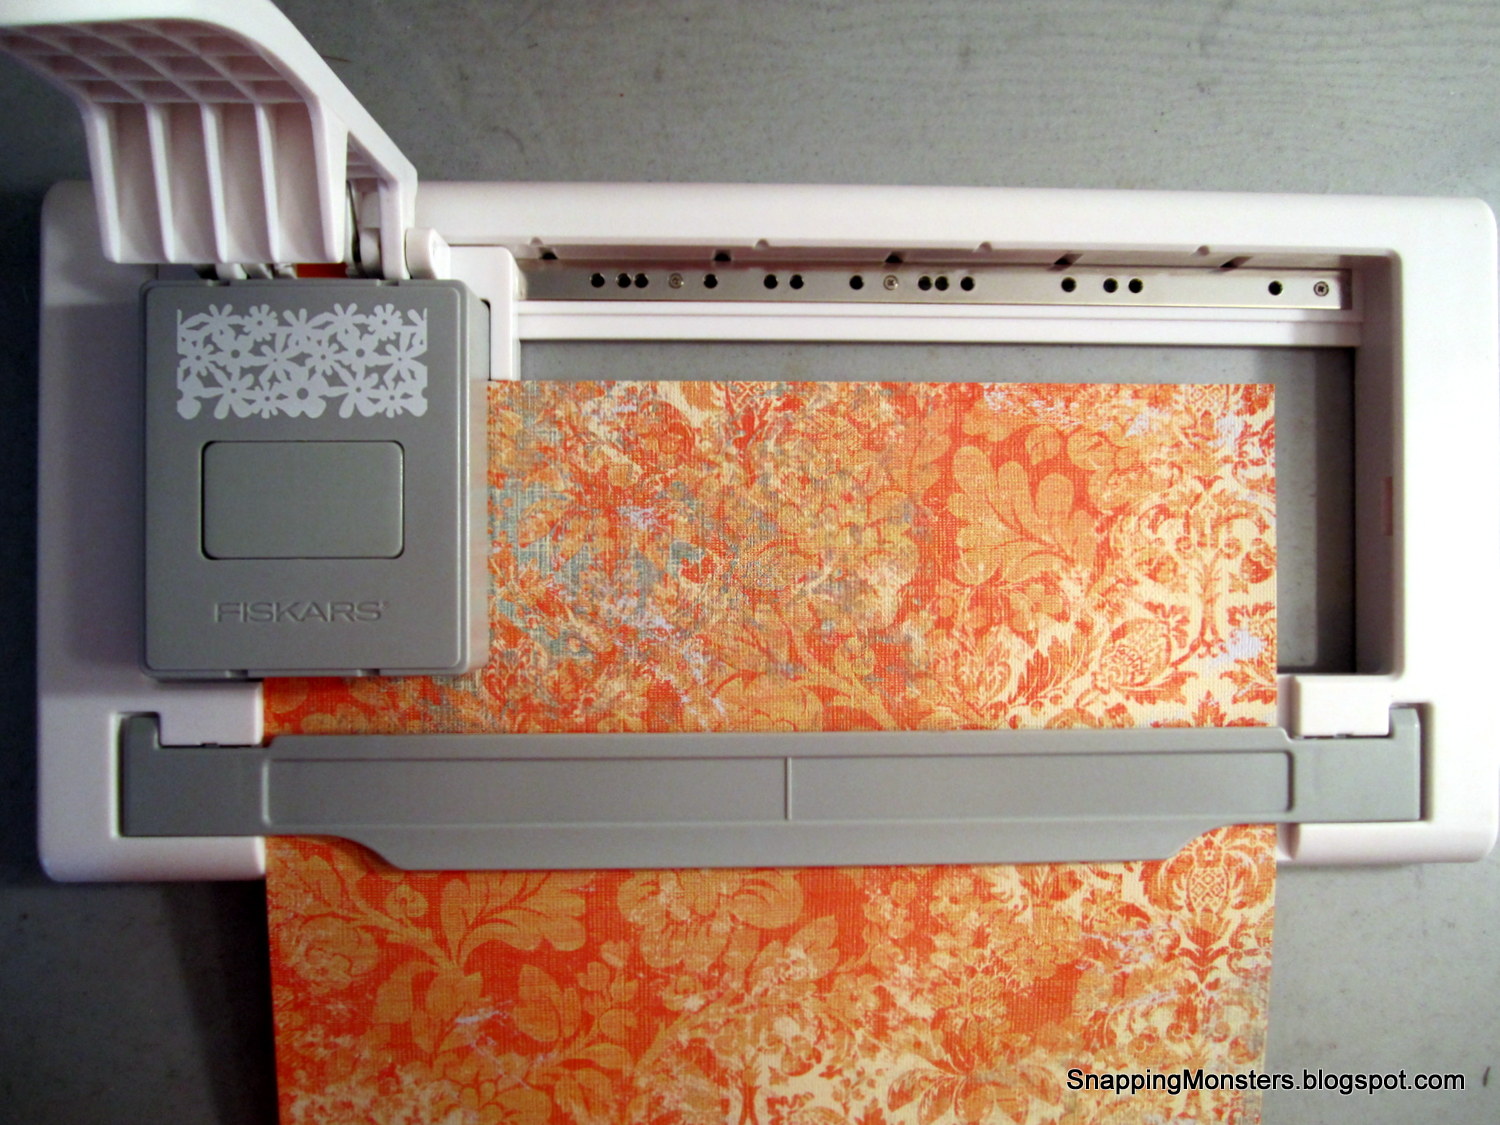
For today's reading and viewing pleasure, I wanted to review a crafty device I recently bought: the Fiskars AdvantEdge Punch System.  Behold!!!!


So what is it and what does it do?  It's a glorified edge punch; like an edge punch on steroids with intricate removable cartridge punches that allow you to cut all sorts of fancy patterns into paper.

Here's a picture of it when it was fresh out of the box and ready to go for its first run!


It's kind of like a paper cutter, but a punch.  So you load the cassette into the holder (the cassette is the gray box with the flower pattern displayed), then slide a piece of paper in between the metal clamps.  Push down the lever and it cuts out the flower strip for that section.  Now here's where it gets different from other edge punches.  Instead of having to slide your paper to line up for the next section to cut, you slide the cartridge while the paper stays stationary!  And you don't have to guess about where to move it to or line it up because the track has little grooves that the cartridge slides and locks into.  All you have to do is slide it till it clicks and you're automatically lined up for the next punch.

Here's a close up of the cartridge:


If you look at the top of the picture, you can see the little grooves in the white part of the track that the cartridge snaps into as you scoot it along.

And here's a picture of the finished product:


Don't you LOVE that flower pattern?  It's my favorite (called Flower Garden) and it comes with the machine.  

If you want to see the machine in action, check out this Youtube video and then we'll get down to the nitty gritty pro's and con's (in my opinion).


I'm very appreciative of this video and it's actually part of the reason why I bought the machine.  But a clarification or two based on people's comments of this video: it is not hard to use.  Some said that it looked really "stiff" to use or required super-human strength, but I didn't have any trouble with it.  I'm not a bodybuilder and I didn't find it any harder to use than any other craft tool that requires lever-pushing or hand-cranking.  Some people also questioned the sturdiness of either the machine or the table because it looked a bit wobbly.  This machine is quality and is pretty solid, so it's more hardcore than it appears in this video.

Now for the pro's and con's.  One pro that was mentioned in the video is that you can use other smaller Fiskars punch cartridges in it if you use the orange adapter.  I don't have any of these other punches, so that didn't affect my decision to purchase.  What I like about it is the ease of sliding the cartridge and having it lock in place so that your pattern lines up easily.  Two thumbs up for that design.  

Another pro is how wide the borders are.  The flower one I punched out was about 2 1/2 inches thick.  I also like how this machine punches the decoration on both edges of your paper; top and bottom rather than just the top like most edge punches do.

Con's (I won't call them con's because I genuinely like this product, so let's call them "considerations").  The first consideration would probably be price.  The punch machine (which includes the Flower Garden cartridge) will cost you a hefty $49.99 plus tax.  I waited until there was a killer sale at JoAnn's and scored it at 85% off (they had a 60% off sale on all Fiskars products and I combined it with a 25% off your entire purchase- including sale items- coupon).  So I got mine for under $20.  But you really have to think hard if you have to pay full price.  And the cartridges are pricey, too!  One cartridge will run you $29.99.  But again, if you use a sale coupon on them, you can get them for half that price.  And I will say that the cartridges are seriously sturdy!  There's nothing cheap about them at all.

The second point to keep in mind is this machine's size.  We all know how our crafty space is at a premium and this machine is approximately 17" long by 8" wide.  It takes up the same amount as a paper cutter, yet you probably won't use it as often.  If you have a place to stash it, go for it.  But if you'll have to leave it out on your work space all the time, you'll really want to decide if the space it takes is worth it for how often (or not) it will be used.

The third thing to consider is that at present, there's not a huge variety of big cartridges.  As far as I could find, there are only about eight of these big new cartridges besides the one it comes with.  And if this system doesn't catch on and it's dropped from production, then that's all there will ever be.  The crafting/scrapbooking market is brutally competitive and always changing, so products do come and go pretty quickly.  Is it worth it to pay that much for a system that you might potentially only buy two or three cartridges for?  Again, that is something to think about.

Despite all of these considerations, the bottom line is that I'm impressed with this machine, I'm glad I bought it, and I'm looking forward to incorporating these decorative borders into some of my projects.  If you can get it for a discount, I'd recommend it because of its ease of use, its durability and the width of the borders it cuts.

Tuesday, December 4, 2012

My Cards and Tags: December 5th SOUS Card Challenge

So a few posts ago I announced my position on the Stuck On U Sketches Design Team.  Yay!  And if you aren't familiar with SOUS, here's the deal-i-o: they provide super cool and inspiring sketches for layouts, die cut projects and cards.  The fantabulous card sketches (I'm biased toward cards, of course) are posted every first and third Wednesday of the month.  So circle those dates on your calendars because those are the days you can go to the SOUS blog and be inspired!

I'll be honest: I love making cards, but sometimes the logistics (yikes!  That's a math-sounding word!) of where to put different elements can slow me down.  The GREAT thing about sketches is that someone's already been the logistical genius for you!  You still have a blank canvas (creatively speaking), but it's a blank canvas with oomph, with an outline, with direction.   A sketch gives your brain a break and leaves you free to simply make it pretty.

So without further ado (though I've already thrown in plenty of ado), here is the first card I created for SOUS:


And here is the sketch that I was given to create it from.  It's designed by Sandi, who is one of SOUS's Designers/Co-Creators (and quite brilliant, I might add):


SUCH an inspiring sketch!  It was very easy to build from!


For my card, I used the following materials:
Paper: My Mind's Eye, Prima
Die cuts/punches: Thread card (Papertrey Ink), 3D flower (Sizzix), butterflies (Martha Stewart)
Embellishments: yarn, vintage tape measure, ribbon, flowers (Prima), twigs (Holiday Inspirations)
Stamp: Studio G
Ink: Tim Holtz, Colorbox

As listed in the supplies, the "twig sprig" is from Holiday Inspirations.  When I bought it, it was a clump of brown twigs with white buds, which was snowy and winter-esque, but didn't work for this card.  So I simply rubbed some pink ink onto the white buds to achieve the "Spring" look I wanted.  Always helps to have season-changing techniques up your sleeve!


I'm excited to be a member of SOUS Design Team and I'm telling you-- if you're looking for a blog that never ceases to provide plenty of sketches and amazing examples of those sketches in use, check out SOUS!