Sunday, November 17, 2013

Tutorials: Christmas Tags with Wax and Dryer Sheets

I am quite biased since this week's theme for the Simon Says Stamp Monday Challenge Blog was my brilliant dad's idea (a total mystery buff), but haven't you loved everyone's interpretation of the "mystery" theme??  

For my project, I decided to go with a mysterious substance to make these Christmas tags:


I already gave it away in my post title, but the mysterious material is dryer sheets!  Oh  boy!  An actual fun reason to do laundry...sort of.  I've used dryer sheets before on projects, but had never combined them with wax.  So here's what I did to make these tags:

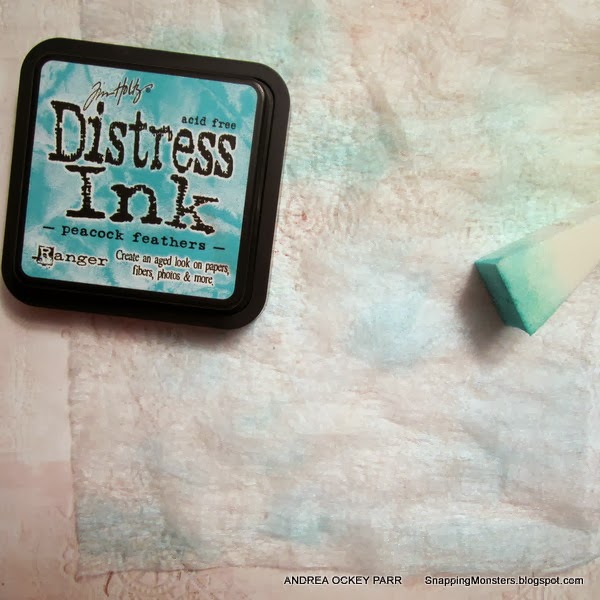
First, I got a used dryer sheet (they work much better if they've been run through the dryer a time or two), some ink, and a sponge.  I just sort of dabbed and rubbed ink onto the dryer sheet.

Next up, I laid the dryer sheet across different patterned papers to see which tag background would look best.  I ended up deciding to use some vintage Christmas music as my background.


I knew that I would also be incorporating wax into this project and wax can flake off, so you need to make sure whatever you're adding wax to is stable and sturdy so it won't bend and allow the wax to chip off.  My next step was to use a Tim Holtz tag die to cut out tag shapes.  I cut them out of the sheet music and out of a very thick chipboard.  I then glued the sheet music tags onto the chipboard tags for a solid base.


After my tags were good to go, I cut the dryer sheet in half and laid it across my tags.  I melted some beeswax in a melting pot and brushed it on top of the dryer sheet that was on top of the tag.  No need to adhere the dryer sheet to the tag because the wax sticks the dryer sheet to the tag for you.  I love the instant hazy ethereal look the melted wax added!


I wanted to add some more texture and pattern, so I smeared some white acrylic paint onto a polka dot stamp and stamped it on top of my tag.


But what to do for the focal point?  I wasn't done with the dryer sheets just yet!  I grabbed another used dryer sheet and sprayed it with Dylusions ink spritz in two different shades of green.  When that dried, I cut out some triangle shapes for trees and glued them onto my tag.  I liked how they were still sort of see-through.  You'll also notice that I trimmed the excess dryer sheet off the edges of my tag.


I thought the trees could still use some oomph, so I added some Ice Stickles and topped them off with some pearl embellishments.  Last but not least, I spelled out "fa la la" with some stickers and added them on then punched a hole through the top of the tag and added some yarns and fibers.


With my other tag background (why not make it easy on yourself and do multiples at the same time?) I made this second Christmas tag:


I always buy holiday twigs and sprigs (at Michaels, JoAnn's, etc.) at this time of year to use on Christmas projects and with wrapping jobs.  They are reasonably priced and add some great wow factor to your creations.


So there you have it!  Wax and dryer sheets and maybe a little too much time on my hands.  Be that as it may, I liked the finished results.  

Here are the fabulous materials I used for these projects that you can get at Simon Says Stamp:


While this week's mystery theme may stretch your brain a bit, I am so excited to see what you come up with!  I can't wait to check out your entries and just remember that you'll be entered to win 50 big bucks at Simon Says Stamp for submitting your creations to the Simon Says Stamp Monday Challenge blog.


50dollar_voucher_600px

Wednesday, November 13, 2013

Tutorials: Stamping on Fabric

This week's challenge over at the Simon Says Stamp Monday Challenge blog is "Get Inky!"  Such a fun theme and in honor of it, I have a tutorial on the Simon blog that shows how you can add ink to your fabric and fabric to your art.  So check out my tutorial if you've always wondered how you can incorporate fabric into your craft projects without sewing or following patterns - yay!


And with a theme whose only requirement is to use ink, surely you have some amazing creations to share!  Show us what you've done on the Simon Says Stamp Monday Challenge Blog and you will be entered to win $50 to the Simon Says Stamp store!
50dollar_voucher_600px

Saturday, November 9, 2013

Tutorials: Painted Washi Tag

Hello friends!  You know I love a good painted Washi project, so here's a tag I recently made featuring a fabulous stamp from Unity Stamp Co.


I started with a deliciously tall and sturdy tag from Prima and covered it with vertical strips of Washi tape, mostly Recollections brand (which you can purchase at Michaels).


Next I added some white Gesso and teal acrylic paint.


When my background was dry, it was just a matter of adding some stamped images (the white stamped polka dots are heat embossed) and a scrap of paper or two.  The central image is a "Be Free" birdcage from Unity Stamp Co. I also punched out some butterflies using a Martha Stewart punch and folded them for a bit of dimension.  I inked heavily around the edges with Tim Holtz's Walnut Stain and Black Soot distress inks.


Last but not least, my favorite finishing touch: picking the right ribbon, yarn, and lace for the top.  I buy fun-looking skeins of yarn as often as I can because it's a lot more economical than buying specialty "fiber packs" that only have a foot or two of each kind of ribbon.

Here is the finished product with yarns and ribbons attached!


Washi's such a great little product and I love the semi-translucent bit of oomph it adds to the background of any project.

Sunday, November 3, 2013

My Other Creations: Visonary Glasses

This week's Simon Says Stamp Monday Challenge theme is "patchwork."  In my brain, patchwork equals quilts and quilts equal the two most amazing grandmas any girl could ever hope to have.  They were extraordinary women who made art out of nothing-- just bits and scraps that they saved as wars raged and the depression hit.  They lived through so many hard things, but they still left this world a more beautiful place through their creations of pottery and quilts and homemade dresses and embroidery.  My mom is the same way (how lucky am I?  She sewed me the sweetest prom dress ever and made me the most amazing quilt in the universe)!  

And so my project this week is a tribute to these women in my life.  I made "visionary glasses" to remind me of how they saw art everywhere.


I decided to try ICE resin, so I made a mold for the lenses of the glasses out of clay and then poured the resin inside.  After they dried, I stamped on a "curiosity" sentiment because I think art requires a good bit of curiosity...for better or worse!


I crafted the rest of the glasses out of wire and went to work on the collaged eyeglass case.  I attached some tissue dress pattern sections onto the case to honor how my mom and grandmas sewed beautiful clothes for themselves and their children.


I'm so grateful to the strong line of women I come from and for the legacy of beauty they've left behind.  They live on through their art (determination personified), which I truly cherish.

This project was a lot of fun to create and I got these products for it from Simon Says Stamp:


I know that YOU must have been inspired in some sort of patchwork-related way in your life!  Share your skills with us at the Simon Says Stamp Monday Challenge Blog and you could win fifty dreamy dollars to spend at Simon Says Stamp! 50dollar_voucher_600px